Tuesday, November 30, 2010

Beauty Quicktip: 8 Secrets For Longer, Stronger, Healthier Nails + DIY Cuticle Oil

I am loving the eye makeup and nude lip combo.  [source]

You don't need weekly spa visits to keep your nails looking their best! Try out some of these easy, affordable tips and get your nails in shape just in time for the Holiday parties!

Invest in non acetone nail polish remover: All polish removers contain solvents that can be extremely drying to your nails. Reach for acetone-free nail polish remover to remove everyday polish, and save the acetone polish remover for nail art, glitter polish and other hard to remove nail lacquer.  - Those that already have brittle, weak dry nails should steer clear of acetone remover until your nails are strong enough to sustain it as needed.  

Use nail polish remover no more than once weekly: This helps keep your nails hydrated and less prone to chips, cracks, and thirsty cuticles.

Don't nip those cuticles: Cuticles help protect the nail from bacteria. Cuticles also help protect new Keratin cells from damage as they age. Remember the Keratin is what gives your nails the strength they need to resist breaking, chipping and cracking. Instead of cutting the cuticles, use an Alpha Hydroxy cuticle remover like OPI Exfoliating Cuticle Treatment. I find that cuticle removers that contain AHA are more effective versus those formulated without it. - You may notice a big difference in the overall health of your nails, I definitely have.

Use a clear coat when going "bare": Nail polish can help protect the nails allowing them to grow longer as protected nails are less likely to chip, break or tear.

Use cuticle oil about once weekly: Healthy, hydrated cuticles are essential to nail growth as healthy hydrated cuticles are essential to healthy hair growth. Don't neglect your cuticles, keep them hydrated, nourished and smooth with cuticle oil. Cuticle oil can also help repair cracked, cuticles and nail beds.

Grab some biotin: Biotin can be a life saver when it comes to growing longer, stronger, healthier nails because Vitamin B is known to strengthen Keratin [Your nails are made up of Keratin]. For best results, take 300 micrograms twice daily. It can also help strengthen your hair too [as hair is 90% Keratin]

File your nails like the pros: Avoid the "back and forth" motion when filing your nails. Instead, file your nails in one direction; it keeps them strong, as well as prevents damage and worn spots on the nail bed. - Also make sure to file your nails once they are completely dry. You never want to file your nails right after a shower or soaking them in water. Filing nails while wet can also cause rips, tears and worn spots.

Give yourself a nail massage once weekly: Nail massages stimulate circulation in the nail bed which in turn fosters growth! You can either do a 5 minute nail/hand massage, or you can buff your nails which also stimulates the nails as well.

DIY Nourishing Cuticle Oil
2 Tablespoons of Jojoba Oil
2 Tablespoons of Hemp Oil
1 Teaspoon of Tea Tree Oil 
1/2 Teaspoon of Vitamin E Oil

*All of these ingredients can be found in most health food stores; or online here {From Nature With Love}

About This Formulation:
Vitamin E: Acts as an anti-oxidant helping to minimize the damage from daily "wear and tear" on your nails. Vitamin E also protects nails from the elements during the harsh cool winter months. Vitamin E oil also helps stabilize the other oils which will help keep them from going rancid.

Hemp Seed Oil:  The omega fatty acids and proteins found in Hemp oil helps stimulate nail growth, and provide nourishment to your nails and cuticles.

Jojoba Oil: Is a non-greasy oil that hydrates and delivers nutrients to your cuticles and nails.

Tea Tree Oil: Is a great anti-bacterial and anti-fungal additive, it keeps nails clear and bacteria free.

Follow MTM on Twitter | Add MTM on Bloglovin'Like MTM on Facebook 
»»  Read More....

And The Winner Is....

 [source]

Thank you to everyone who entered the Pangaea giveaway!!! - The winner is: ARABA, who said: 
oooh, so so pretty! I know I will rock the HECK out of the white and aquamarine hoops with a neutral outfit (black and white or gray to let the color POP) and the curliest, fluffiest, roundest afro I can manage. *Runs to twist hair in preparation*
I hope you have twisted your hair chica! LOL Drop an email to nikole@themoptopmaven with addy and name! Until next time [I have a super christmas giveaway planned. Stay tuned]

Follow MTM on Twitter | Add MTM on Bloglovin'Like MTM on Facebook 
»»  Read More....

All About Hair: Do You Experience Knots, Tangles & Matting When Wearing Your Hair "Out"? Try This Moisturizing Mist/Leave In Recipe!

If you have extremely curly hair, chances are you have experienced those annoying little knots, balls, or tangles on the ends of your hair on about the second or third day of wearing your hair in natural, "free-flowing" styles [braid-outs, twist-outs, etc]. Not only can they be frustrating, but they can also cause additional tangles, knots and subsequent damage if those issues persist.

Lately I have been experimenting with different moisturizing formulas because honestly I am always searching for the next best thing. The weather has been pretty frigid as of late, and as a result, my favorite products are not as moisturizing as they once were + my ends are starting to curl up on themselves which means it is time to up the moisturizing ante. I  picked up some of my favorite products and played kitchen chemist the past few weeks, and this simple recipe was definitely a winner: 

Ingredients
4 ounces of Suave Almond & Shea Butter Conditioner  [you can use your favorite condish]
1 vial of Fermodyl 619 [formulated for kinky, coarse hair]
2 teaspoons of Aloe Vera Juice 
Enough water to make it a light, spray-able consistency

Directions:
  • Add all ingredients to a spray bottle, and shake to mix well! 
  • Lightly spray on hair nightly and cover with a satin bonnet. This dual purpose spritz will help hydrate your hair during the harsh winter months; and eliminate the knotting dilemna's by lubricating your strands and keeping your cuticles flat which means little to no tangling and/or matting. This formula is light enough not to weigh your hair down, and is suitable for nightly use.
Benefits:
Ultra hydrating formula keeps your hair soft and shiny
Lactic acid found in Fermodyl 619 minimizes tangles, matting and knots; making it more manageable
Aloe Vera acts as a protective barrier against the harsh, cold weather 

About this formulation:
  • Conditioner: Helps keep hair supple, cuticles flat, and hair ultra hydrated
  • Fermodyl 619: My Holy Grail in a vial; this product keeps those cuticles laying flat which means less frizz, less tangles, matting, knots and less fuss. 
  • Aloe Vera Juice: Aloe Juice makes an excellent additive as it nourishes your follicles, protects your hair, and offers a bit of hydration as well
  • Water: One of nature's best moisturizers; if you have hard water, opt for bottled distilled water. Alternatively, you can use Rose Water for a luxurious treat [I love the moisturizing effects of Rose Water].
Follow MTM on Twitter | Add MTM on Bloglovin'Like MTM on Facebook 
»»  Read More....

Monday, November 29, 2010

Let The Beauty We Love Be What We Do - Rumi

You were born with potential
You were born with goodness and trust
You were born with ideals and dreams
You were born with greatness
You were born with wings
You are not meant for crawling, so don't.
You have wings
Learn to use them, and fly.
~ Rumi 


One of my favorite poems by Rumi, I have this plastered on my bedroom wall as a daily reminder. Sometimes we forget how great we all are and these little subtle reminders can help lift our vibration and re-connect with our inner guidance system. 

I like flipping through books like "The Essential Rumi" or The Prophet [Khalil Gibran] before creating because it puts me in a better place spiritually. As a result, I am illuminated, limitless and free of censorship. - These are pieces I created over the weekend using some new raw materials and old favorites sourced from over the years. I was flipping through my daughters National Geographic book this weekend and felt inspired to create pieces for the warrior inside of each goddess. I have a few more items on my workbench that I will complete in the next few weeks. Items pictured are available in the shop now! 

I added some new earrings:
Nubia Drop Earrings $35
Red Phoenix Drop Earrings $36
Isis Drop Earrings $35
Kemet Fringe Earrings $24
 Byzantium Tassel Drop Earrings $28
- 
And some necklaces: 
Benin Tribal Necklace $44
 Amina Warrior Breastplate Necklace - $65
Papua Howlite Double Strand Necklace $82
 Prospect Necklace | Specimen N0. 01 - $26
Prospect Necklace | Specimen N0. 05 - $26
And some cocktail rings made from genuine gemstones 
 Prospect Rings - $21 each 

To view more new items, or the full collection visit the Frank & Myrrh shop {here}


Follow MTM on Twitter | Add MTM on Bloglovin'Like MTM on Facebook 
»»  Read More....

In The Kitchen: Spicy Shredded Chicken Soup

The weather is finally starting to get a little chilly in L.A so I wanted to experiment with more "comfort foods" using some of my favorite spices. I really love snuggling up with a blanket, my laptop, and a good bowl of soup when it's raining outside. - So I turned to my new favorite recipe database and found this amazing recipe for Spicy Chicken Soup. 
This delicious dish is incredibly easy to prepare and flexible just in case you are inclined to make any type of modifications. I made a few in regards to the amount of spices and seasoning's used [original recipe can be found here], and I also used frozen corn in lieu of canned as I find it better suited for soups. One major modification I made was letting the soup simmer for about 45-50 minutes versus the 30 minutes the recipe called for; this allows for the perfect marriage of spices, yummy. 

Spicy Shredded Chicken Soup [Adapted from All Recipes]
4 cups water
4 skinless, boneless chicken breast halves
1/4 teaspoon salt
1/2 teaspoon ground black pepper
1/2 teaspoon garlic powder
2 tablespoons fresh parsley
1 handful of chopped cilantro
1-1/2 teaspoons onion powder
2-1/2 cubes chicken bouillon
1 tablespoon and 1-1/2 teaspoons olive oil
1/2 onion, chopped
1-1/2 cloves garlic, chopped
1/2 (16 ounce) jar chunky salsa
1 (14.5 ounce) can peeled and diced tomatoes
1/2 (14.5 ounce) can whole peeled tomatoes
1/2 (10.75 ounce) can condensed tomato soup
1 tablespoon and 1-1/2 teaspoons chili powder
1 small bag of frozen corn
1 (16 ounce) can black beans, drained
1 (16 ounce) can kidney beans, drained
1/2 (8 ounce) container sour cream

Directions
In a large pot over medium heat, combine water, chicken, salt, pepper, garlic powder, parsley, onion powder and bouillon cubes. Bring to a boil, then reduce heat and simmer 1 hour, or until chicken juices run clear. Remove chicken, reserve broth. Shred chicken. 

In a large pot over medium heat, cook onion and garlic in olive oil until slightly browned. Stir in salsa, diced tomatoes, whole tomatoes, tomato soup, chili powder, cumin, cilantro, corn, beans, sour cream, shredded chicken and 5 cups broth. Simmer 30 minutes.  
Enjoy with blue-corn tortilla chips & a dollop of sour cream!
And maybe even a little shredded cheese :-)

 
Follow MTM on Twitter | Add MTM on Bloglovin'Like MTM on Facebook 
»»  Read More....

Fashion & Beauty Ethos: DIY Betsey Johnson Mani

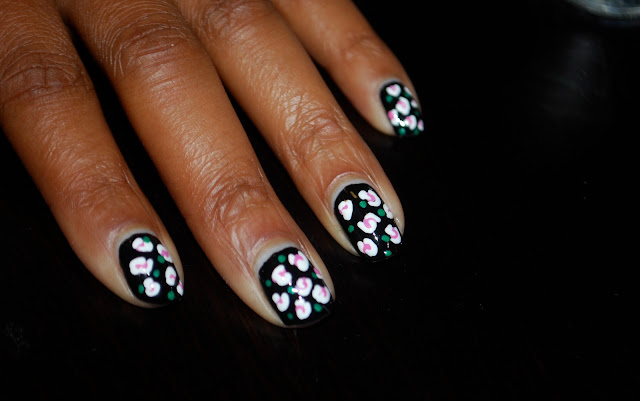
This manicure reminds me of Betsey Johnson's iconic floral print. It was extremely easy, in fact I did all of the nail art with a toothpick. I find toothpicks or bobby pins much easier to control versus those long nail art brushes. The entire mani took me about 30 minutes from start to finish [not including drying time] which isn't pretty bad considering the payoff. 

Betsey Johnson Mani
You Will Need: 
Base Coat
Black Nail Polish <- I used Rimmel "Black Satin"
Pink Nail Polish <-- I used Sally Hansen's "Bubblegum Pink" in the Extreme Wear series
Green Nail Polish <-- I used Sally Hansen's "Going Green" in the Extreme Wear series
White Nail Art Polish 
Toothpick 
Topcoat
Apply basecoat
Paint nails with two coats of black polish
Using your toothpick, randomly place medium sized dots of pink nail polish
Using a new toothpick, outline your nails with the white polish. Don't make the outline perfect, follow the method that is illustrated above [two half circles]
The finished outline should look similar to this
Place green dots near each "flower" 
After designing each nail, apply a top-coat and allow your nails to dry thoroughly for about 20-30 minutes! 


Follow MTM on Twitter | Add MTM on Bloglovin' Like MTM on Facebook 
»»  Read More....

Friday, November 26, 2010

Instant Funk: My Christmas Wishlist

Dresses with unique patterns
Flats & more eye + headwear
A nice animal print bag; preferably one with leather like this one
Colorful leather gloves & flirty tiered skirts
More scarves
Basic Tees + scarves
Dark shades
Vintage dresses + statement necklaces
Bold colors
Chunky jewelry 
Hair color...although I will be too chicken to ever go through with it.


What's on your Christmas Wish List??

{Photo Source
 
Follow MTM on Twitter | Add MTM on Bloglovin'Like MTM on Facebook 
»»  Read More....

Quicktip: Experiencing Breakage? Try Out These Super Herbs For A Natural Fix

 [source]

When I first started my healthy hair journey, my hair was breaking like crazy. Every time I would comb, brush, or style my hair, there would be tiny little broken hairs on my shirt, bathroom counter, and floor. At that time I tried heavy protein treatments [which caused some shedding], as well as hair creams specifically formulated to control breakage [which resulted in dryness].  - A few months later I began to dabble in herbal remedies, and I was hooked on Herbal Rinsing! 

Herb rinsing can be done by steeping herbs in hot water, letting the water cool, then pouring it over your head after rinsing out your conditioner. You can do herbal rinses to add shine, softness, nourishment, elasticity, and my favorite; to control breakage. Here's a list of my favorite [and extremely effective] herbs you can use for herb rinsing:

Breakage                                                                                                                                                     
Burdock Root: This herb is known to strengthen and repair hair while adding sheen, hydration & luster. Burdock Root is also effective in reversing hair loss, correcting scalp issues, and promoting hair growth in individuals with a short growth cycle. The mucilage in Burdock Root also helps add "slip" to your hair making the detangling process a lot easier.

Rosemary: The nutrients found in Rosemary can strengthen your strands much like that of a protein treatment, minus the drying effects. Rosemary also imparts shine, body and softness. This super herb also helps to correct scalp issues like dandruff and psoriasis.

Blue Malva: Is one of my favorite herbs to use for strengthening and repairing hair. Blue Malva is extremely effective in controlling breakage, and repairing chemically damaged hair.

Hibiscus: Hibiscus strengthens hair from the papila root to the ends of the hair, and works to seal the cuticles stopping breakage in it's tracks. Hibiscus is also loaded with mucilage which means it is very effective as a detangling agent for highly textured curlies. This herbs also adds an incredible amount of softness and body to both relaxed and natural hair. **Hibiscus can stain clothes, so use caution when attempting a rinse with this herb**

Shine + Softness + Body                                                                                                                            
Horsetail: Horsetail contains high amounts of silica and cysteine which are both great at conditioning hair, whilst adding shine and body. The silica found in Horsetail also helps to strengthen the hair and improving the elasticity as well.

Nettle: Nettle is rich in nourishing minerals that work to strengthen hair, add luster, and impart softness. This herb also stimulates circulation which in turns promotes hair growth.

Coltsfoot: Coltsfoot contains an abundance of mucilage, minerals, silica, sulfur and plant proteins which all work together to help add sheen, body, repair the hair shaft, improve elasticity, and promote hair growth.

Split Ends                                                                                                                                                   
Burdock Root
Horsetail
Nettle
Hibiscus

Directions:
- Add 1 cup of water to a small saucepan and bring to a boil 
- Turn off heat and add 2 heaping teaspoons of your herbs to the water << For best results, use herbs that have been cut and sifted [these are usually labeled as C/S on packing and websites], as they contain more essential ingredients and are usually easier to use in comparison to powdered herbs. 
- Cover saucepan and allow herbal infusion to steep for about 15-20 minutes
- Remove the herbs, or strain through a fine sieve or cheesecloth
- Let cool
- Pour entire mixture over your hair after rinsing out conditioner
- Do not rinse out, any smell from herbs should dissipate after about 20 minutes  

How often should I do an herbal rinse?                                                                                                  
For best results, use once weekly [or as often as you shampoo].

Where to purchase herbs?                                                                                                                        
You may purchase these herbs at your local Health Food Store, or online through the following reputable vendors:

Follow MTM on Twitter | Add MTM on Bloglovin'Like MTM on Facebook 
»»  Read More....

Living Reflection of a Dream...

(gypsygardens.tumblr.com, we heartit.com, fanpix.net, fanpop.com, splitpeavintageblog.tumblr.com, takemyhandchild.tumblr.com)

Title: "Tangerine"- Led Zeppelin

Been drowning my thoughts in wine while looking at the stars. Sounds easy but sometimes it´s quite hard. Reality finds its way to wrap you. No need to close my eyes, anyway. Dreams haunt me day and night. What can i say? I´m a dreamer. Hopefully i´m not the only one.
Don´t jugdge me. Blame it on my nature and take me the way i am.

Remember, be yourself. Never change, never stop.

After all, if you can still SMILE, you´re all right.
»»  Read More....